
A few people have asked me what they need to get started with rock painting, and I recently put together a “rock painting starter pack” with a few of these items as a gift, so why not share it here, too?
You don’t need much to get started – you only need four things (this is not sponsored, none of these are affiliate links, I didn’t link to every item):
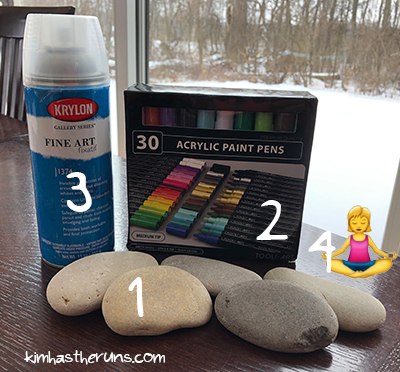
- Rocks! – You can buy river rocks from big box hardware stores or landscaping places (or even Amazon). Sometimes you can obtain permission to take rocks from natural areas.
- Paint Pens – unless you’re into it, I’d recommend skipping actual paint with brushes and going straight to paint pens. They’re much easier to control and have a smoother look. Just make sure you follow the directions on how to use them and store them. (These Tooli-Art ones have worked well, as a beginner. Everyone raves about Poscas but I haven’t tried those yet!)
- Sealant (Matte) – acrylic paint and paint pens should be weather-proof but I seal them anyway. The photo above is of a matte fixatif I am using as a sealant. I tend to prefer matte sealants over glossy because I like the aesthetic better and they are less likely to alter/darken the background. I’m still trying to find my perfect sealant, so I am not providing a link here. But I’ve tried four sealants so far if you want to chat about it…
- Patience – this is the one thing I don’t have. Paint pens dry fast on the rock but you gotta wait for them to dry before you draw a new color on top of them (unless you’re trying to blend)… and I don’t always… then my pens get all gunky… then I say a few swear words…
Extras!
You don’t need any of these, but they’re useful tools!
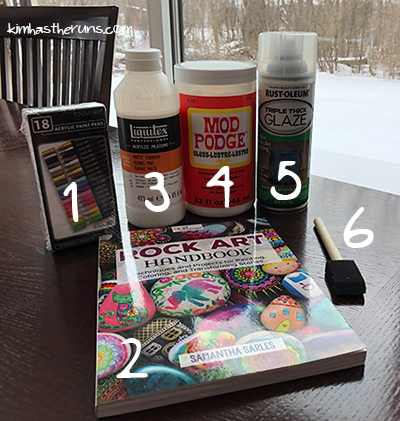
- Fine Point Paint Pens – I use these for small details and outlines. Interestingly, the color doesn’t always come out as intensely as is does in the fat pens, and sometimes a pen of the same color won’t match it’s fatter pen in the other set. It’s a lot of live and learn over here. (Speaking of learning, I found out Tooli-Art sells extra tips and packs of single colors on their site so I ordered some this weekend – I go through white and tan fast, and would like to replace my tips more often (each box comes with three replacement tips)).
- Rock Art Handbook – This is Sam Sarles, of Color Made Happy‘s, idea book. You can find all the tutorials and info online, but this book is a one spot stop with all the info printed in it!
- Varnish – I’m new to using varnish, and chose matte, over glossy. It’s an extra layer of protection on the rock over sealant, and should keep the rocks from scratching, and protect them from UV rays. It’s not clear to me if you can skip sealant and go straight to varnish (I’m always learning). Some of my rocks were scratching when another rock touched them and I wanted to prevent that.
- Mod Podge – this is my first time using Mod Podge in my life! I use it to apply the paper tag on the back of the rock that has instructions and the name of my rock Facebook group.
- Sealant (Glossy) – every once in awhile I want that glossy look so I use a gloss sealant.
- Foam brushes – I use these to apply varnish and mod podge. And the cats like to play with them.
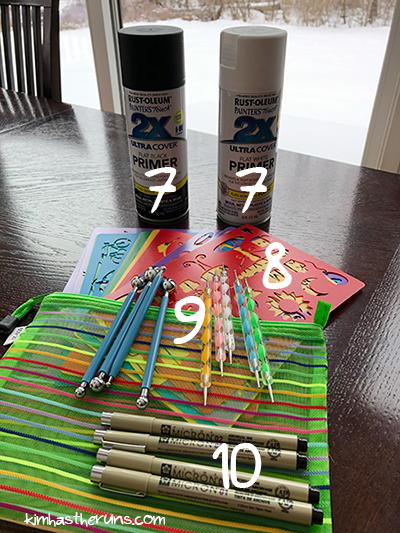
- Black and White Primer – for when you want an all black or white background. Steven picked these up for me at Menards or Home Depot.
- Stencils – I haven’t used these as much as I thought I would (I mostly freehand) but every once in a while I do! In the rock painting starter pack I made, I outlined some of these stencil designs in pencil on rocks in case they wanted to draw from an outline.
- Dotting Tools – These tools help you paint perfect circles and require actual paint. I haven’t used these yet. There’s a whole subset of rock painting called Mandala rocks and they’re amazing and require these. I bought them so I could paint better animals eyes. Ha.
- Even Finer Tip Black Pens – for when you need a even smaller line.
Not pictured:
- A Pencil – I outline my designs in pencil and paint over them (then erase any errant marks). I heard some people use white chalk because it’s less likely to show up.
- Silicone Molds – if you can’t find rocks to paint, you can make them! I have some silicone baking molds (cats and Star Wars shapes) and concrete but haven’t made mine yet.
- Concrete – to make the rocks.
- Actual Acrylic Paint – I have a 30 color set and some individual glitter paints (from Walmart) too.
- Brushes – if you decide to go that route, definitely get good brushes! The crappy ones will irritate you.
- A Marker Case – I love love love mine, and if you click on the link, you can see it comes in other patterns.

Such a fun hobby! Thank for sharing the ‘how-to’.
You’re welcome! 😀
This is an awesome list!!! Once the kids are older I hope I can paint more rocks like my big snister!! 🙂
Aww thanks! You will kick ass at it, for sure.
This is so informative! I wish I had the patience for something like rock painting because I’m sure it’s a soothing hobby. But I get so frustrated by artsy stuff, as we’ve discussed! I’m glad you’ve found such a wonderful hobby for yourself, and get to pass on these delights to other people!
Thank you! And that is totally understandable. I feel like there is a huge bump getting into a lot of these hobbies where at first it’s frustrating then you learn a bit and it becomes more and more soothing. Knitting was that way for me!
And thanks, I am too!