
It turns out that siding has been one of the most fun parts of building the garage so far! Probably because:
- It’s like putting together a giant puzzle
- The weather has been amazing – lows in the 50s, highs in the 70s
- We have an extra set of hands here helping – Dad!
- It means we’re almost done building the garage!
Here’s a finished photo! Read on if you want many details and pics!

Ooo la la!
Last weekend (10/31 and 11/1) and week, to prep to install all siding, Steven installed custom pieces of frieze board that go between materials (brick/vertical siding, and brick/horizontal siding), and installed vertical trim pieces to go between the brick and siding. He also installed the vertical black siding that goes around the man door (yes, anyone can go through this door, that’s just what the human door is called in a garage), which was… interesting. The manual was written for a fantasy land, where all walls are the exact length of the boards and the wall width is always divisible by whole boards. So in reality there were a lot of details to figure out, and the connectors that came with it didn’t actually work due to the material design, but Steven figured it out. He’s so good at figuring things like this out! (It would be nice if it just worked though!)

We got the vinyl siding installed in three days! Here’s what we did each day:
Friday
We started the installation in the back, because that’s the best place to learn – if we mess up, no one will see it except our neighbor.

Back, before
We started by taking down the downspouts, then installing the corner pieces, which have a channel the siding rests in. That channel also hides the edges and makes the installation look uniform.

Next we measured where we wanted our starter strip to go (we wanted the siding to hang below the wall sheathing by 3/4″), checked that it was level, snapped a chalk line, and installed the starter strip. The starter strip determines how level the entire installation will be because you install from the bottom up – each piece of siding snaps in to the one below it. So if you start off unlevel, your whole installation will be off! Eek!

Starter piece close up
Then we started snapping the first row in! It makes a very satisfying “snap” noise when it’s clipped in correctly!

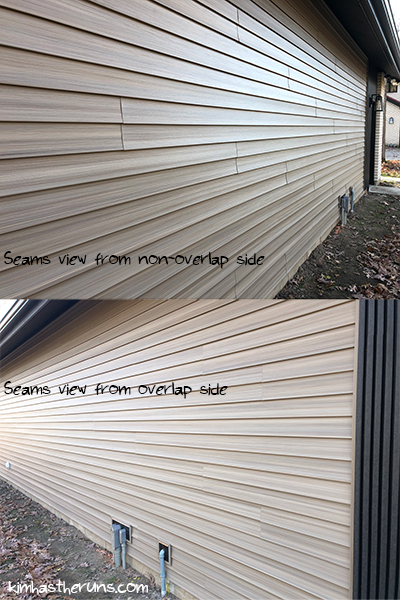
We immediately realized we needed to pick out a cut pattern. Did we want it to look random, or like stair steps? We went with stair steps, based on pieces at quarter length of a full piece – so cuts at 3/4, 1/2, and 1/4, and repeat.

Yes, I went to school for architecture…
We installed as much as we could on the back without using ladders, which is ten rows (and each piece is a double row, so it looked like twenty). Steven and Dad snapped the pieces in and nailed them. It’s important that the siding can contract and expand with the temperature variance, so the pieces are installed 1/4″ from the corners, and have a special cut (pre-fab, but we had to make some on our own) that allows them to move where they overlap one another. The top of the siding has a row of holes and the nails are installed in the center of the hole, with about an eighth of an inch between the nail and the wall to allow the whole thing to move.

Profile of siding – you can see the holes in the top in the ones lying on the ground
My job was to cut all the siding to the right size (3/4, 1/2, or 1/4), and lay it out with whole pieces for Steven and Dad to install. They worked fast and running back and forth from the miter saw kept me busy! Each end piece had to be cut to a non-standard size depending on where that row ended up.

Siding laid out in order of installation. I’d lay it out, then lean it against the building where it went so they could just grab it and go. It was pretty efficient!

After lunch break we started on the south side, with the same technique – install a level starter strip, and install from the bottom right, and up. Because the siding overlaps, you can’t see the seams as much on the overlap side, so we installed installed it with the overlap side being the front.
View of north side, spoiler!
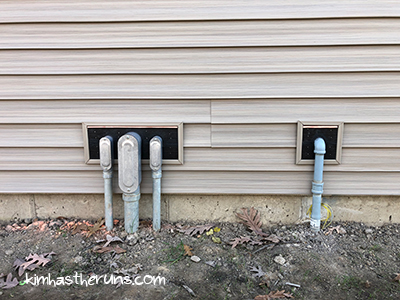
We installed a J-channel next to the brick for the siding to rest in. We paused in the second row of siding to cut out a hole for an electrical box. We meant to install one in the back and forgot. Whoops.


We got ten rows done on the south side and called it a day!

Saturday
On Saturday we started on the north side. It was the same as the south side, with a cutout for power, but also special cutouts around the electrical and gas that took a bit of time! Steven made the frame out of J-channel, and cut whole pieces with slots to go around them.
We installed a J-channel next to the black siding for the tan siding to slip in to, similar to the corner pieces:
![]()


We got ten rows installed on the north side, took a lunch break, then set up scaffolding and installed as much as we could of regular pieces on the south side, then figured out how to finish it out. A J-channel piece goes in the top, then an under sill trim piece goes inside of that, then you have to rip a row for whatever space you have left for a piece of siding at the top.

J-channel on top
Here’s what the top row looks like – the black on top is the frieze board, the J-channel is under that, then the sill trim piece (which you can’t really see – it’s just another line in the photo), then the tiny piece of ripped siding, then a piece of siding with the holes cut off. The holes had to be cut off penultimate piece so there was room to slip the tiny piece in on top of it. We bought a special tool to crimp the tiny piece so it snapped in to the sill trim piece on top of it.


Ripping the holes off of the second to last piece of siding so it will fit

Ripping the tiny siding piece that goes on top
Long story long, this involved lots of specialty cuts that slowed us down.

But we finished the south side on Saturday!

Sunday
On Sunday we moved the scaffolding to the north side to finish out the top.

It was a similar install with a tiny piece on top, just a slight difference in that we had a bit more space so we didn’t have to rip the holes off the penultimate siding piece.


We finished the north side and installed the coach light and took a photo for us to use on the back of our holiday card!

After lunch we moved to the back. I was nervous about having the scaffolding up higher, and about making the angled cuts for the roof slope, but it went okay! We had some trial and error cuts, but eventually we made some template pieces for the two sides, and it went smoothly after that.
We started with installing the J-channel on the right, then making the first special angled piece.

At first Steven was cutting the angled pieces on the scaffolding, but we decided to have Dad cut them on the ground… just a bit easier (and safer)!


We installed as much as we could with the scaffolding, then folded the ladders out to be extension ladders to finish it out.

We had to put some sill trim piece in the top to make the final tiny piece (below) fit in!


Overall, siding is easy to install, when you’re doing long straight lines of it. Ripping the boards and making special cuts in trim pieces slows you down, but it’s easy-ish to work with (we used a miter saw, table saw, snippers, and an angle grinder). I’m impressed we got in done in three days, especially since none of us had done it before. We worked from around 8:00/9:00 to sunset/4:40 pm each day. I’m so glad my dad was here helping – it was so great to have a third set of hands, especially someone who’s good at cutting – Steven is, but ripping the boards took two people and while I’m getting better at it, Dad has a much steadier hand. And I’m horrible with the angle grinder!
So now the garage is virtually complete! We have minor things left to do: paint the exterior outlets (connect wiring inside), paint the door, re-install the downspouts (done!), trim house wrap from under siding, install little trim pieces, and install power inside. It’s so nice to look out the window and not see the building wrap anymore! It looks like a real garage now!

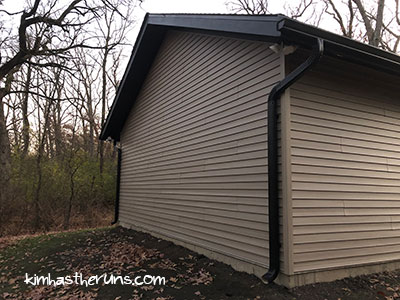
Back with gutters re-installed
Previous Post: Garage Project: BRICK! (and gutters and other updates)

OK first of all, that is one beautiful garage!! I know you guys are proud of it, and you should be! Y’all BUILT A FREAKING GARAGE!!!
Second, the siding looks fantastic. The installation job looks professional, and the siding itself looks good; I like the bit of grain/texture on it.
Third, my favorite part of the siding is the black vertical part around the human door. It reminds me of MCM architecture, which I love. (One of my dream houses is a very MCM house. The other is a Craftsman. Oh and we can’t forget the beach bungalow…I guess this is why they are dream houses, no?)
Fourth, and I don’t know if I’ve mentioned this before, but I’m always impressed that Steven does his work while wearing a button-down shirt. He reminds me a bit of Norm from This Old House. 🙂
Thank you so much! We are feeling proud!
Thanks! I am pleased with how it turned out. I didn’t know if it would look cheesy since we had to buy a cheaper material, but I think it looks fine. I like that texture too!
I am so glad we decided to put that vertical siding in! Steven did a bunch of renderings in Photoshop over the summer and it just looked like too much tan (or too much of whatever color we were showing there) and I suggested a vertical black siding and I think it really helps break it up. We really like MCM but can’t get too much of it outside since our home is all brick and this (and the coach lights) were our nod to it. I hope you get ALL your dream houses one day! Or maybe the kadults could do one in each style? 😉
Buah ha ha! I don’t think you’ve mentioned that but lots of people comment on it! He even wears button down pajamas to be in the winter! <3
It turned out so lovely!! I love the finishes you guys chose. Good work!!!! I know that is a huge relief!
Thank you! It is! It’s so nice not to see that wrap anymore, even though it did have my name on it 😉
This was so interesting to me! Mostly because I write about siding installation and such, but usually in broad terms, haha. I just had to write content for a siding manufacturer that makes siding accessories like J-channels and I had NEVER heard that term before. I had to do a lot of research to figure it out (and still not exactly sure I know what it means, lol).
HOORAY FOR THE GARAGE ALMOST BEING DONE. What a relief!
I think it’s so interesting you write about such broad things and get to research and learn so much! I did not know what J-channels were until last weekend, but I sure do now. I was looking at the installation guide and there are several accessory pieces we didn’t buy or need to use. You know what is so funny about all this? When Steven was placing the siding order he didn’t know what all he needed, and as he looked at things, he look at the “other people bought this as well” section and that is how he figured out what he needed (well, then he’d google that thing and watch YouTube to figure out what it was).
It is!!! Yay!
YAY!!!!!! Congratulations!!! What an amazing accomplishment for you guys! It’s got to feel SO good to have it basically done.
I’ve never considered siding patterns before, but the picture you have (“Seams view from non-overlap side”) does make that stair-step pattern look really good. It looks very intentional and ~designed~. I like it!
Thank you! It does! I can’t wait to see it through all the seasons now.
Thanks! I am glad it looks like that cause we were like, “oh yeah, we should pick out a pattern…” ha!