
After the insulation and wire grid were placed for the garage, we needed to lay the radiant heating tubes, connect them to the manifolds, and have it inspected as soon as possible. Once we passed inspection, we could tell the crew we’re ready for them to come back and pour the slab. We don’t want to hold that up!
Dad arrived Monday night to help us out, and on Tuesday morning we finished adjusting the insulation in an attempt to eliminate more thermal bridges. Fingers crossed.
Then we got to work laying the tubes. We followed the pattern Steven designed, using elbow grease to bend the tubes in to the correct configuration, and zip ties to hold them in place. The tubes came in a huge 1200′ roll, and one person’s job was just to hold the roll, unravel it, and keep it from twisting. Knee pads were definitely required for crawling around and placing the tubes!
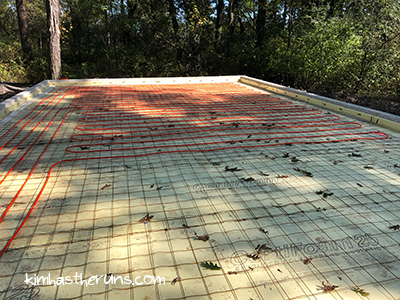

Midday progress photo – see huge spool of orange tube in front!
Half the tubes were laid by lunch. I had to work a few hours in the afternoon, and when I was done, they’d completing laying all the tubing (excluding the sidewalk and part of the driveway – that’s not ready to be done yet) and were ready to connect it to the manifold.

Leaves, leaves, everywhere!
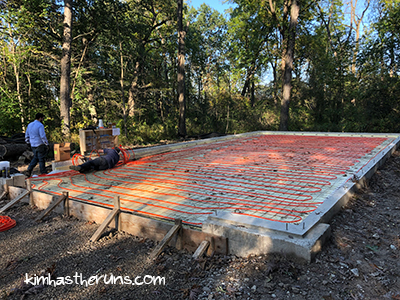
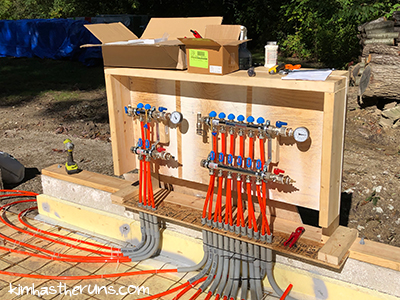
Each tube has a hot end and a cold end, and they connect to a certain part of the manifold. Water and glycol will run through the tubes to heat the slab. The heated slab will keep it warmer in the garage, and also mean we don’t have to shovel the sidewalk or that part of the driveway (which will be installed later)!!!! Per our county’s requirements, we cannot put gas in our garage to run this system until we insulate the walls of our garage. We won’t be insulating the walls right away, so the radiating heating system won’t be a go from day 1.

Before…

… and after!
While I was working Wednesday morning, Steven and Dad pumped the radiant heating system full of air to pressure test it. The only part that leaked was the temporary part that they added so that they could pump it full of air, and they fixed that right away. After that it worked great, so Steven submitted for an inspection.
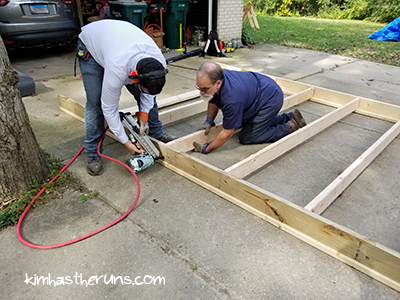
During that time, Dad started getting the pressure-treated 2×6 sill plates prepped for framing – measuring where the 2x6s studs would go on them, and where the holes would be for the foundation anchor bolts. Steven and Dad also spent time grinding off major imperfections on the foundation wall so that the sill plates would sit more flush on the wall. That was a dusty job!!! Face masks for everyone!!! After grinding down the wall, they’d put sill seal down – a piece of foam to fill any remaining gaps between the sill plate and foundation.
I took a bit of time off midday to help them, and made sure all the radiant tubes were laying flat, and that we had zip tied them down every 3 feet. I also started cutting all the ties off. Not surprisingly, that seemingly small task took a few hours. And gave me a few blisters. Wah. Ha.
I went back to work for an afternoon meeting and was surprised to look out the window and see part of a wall framed and up! Exciting!
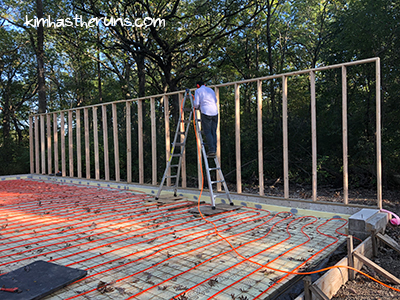
Steven and Dad worked out a method for assembling the framing in 12′ sections and raising it. They’d lay the sill plate and top plate down on the driveway, then bring the studs over, line them up, and inspect them for warping. Then they’d use the nail gun to attach the studs to the top plate, then the bottom plate. Then they’d carry that section over, get it up on the bolts, and bolt it down.
We had our first job site injury when Steven and Dad were getting a wall ready in the driveway. Steven was holding his hand too close to a joint while using the nail gun, and the nail hit a knot, came out the side of the board, and pierced his finger. Ouch!
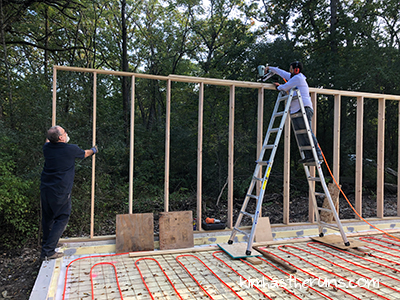
After they got the entire south wall raised, they installed the second top plate, which was challenging, because we don’t have a foundation poured yet, and had to place the ladder over wood 2x4s and pieces of plywood so as to not puncture the foam or damage the radiant heating! Moving those boards and the ladder around is a pain!

See the boards under the ladder?
They used the second top plate to get everything aligned and square.
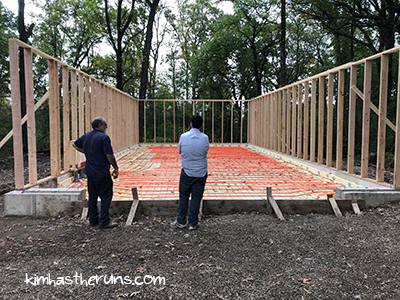
After they got the south wall up, they braced it, and called it a day!

On Thursday I worked in the morning, and they got the east and part of the north wall up!

The inspector came after lunch. His main concern was the insulation we used. He didn’t inspect our pressure, the tubes, or zip tie placement. We were disappointed he didn’t check out our work, but we passed, so whatever. Our contractor is going to come pour the foundation on Wednesday. Yay!
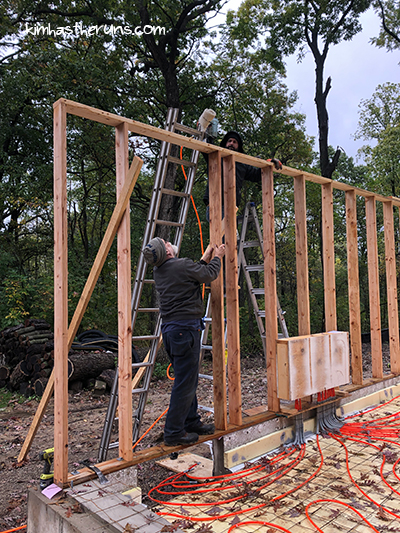
We put the rest of the north wall up in the afternoon, and installed more top plates, but didn’t complete them – the weather app said it was going to rain so we had to finish up and put tools away earlier than we wanted. And sure enough, it rained.


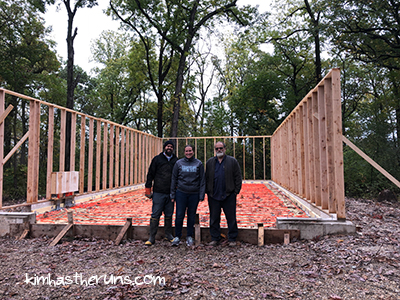
Standard photo I’ve been taking each project day
I posted this photo on Instagram and said that Steven and Dad were admiring their hard work, but really, they were talking about whether they effed something up (they didn’t)
On Friday it rained most of the day! UGH. We went out for a break in the middle of the day and fixed a stud that was misaligned, and ground down the west side (garage door side) of the foundation and got some new foundation anchor bolts installed. Then had to call it a day after an hour. UGH.
But! We got so much done in three days and we had beautiful weather to do it – it was cool in the mornings, so we’d work in jackets, then take them off when the sun came out mid morning and in to the afternoon, then we’d put the jackets back on late afternoon. It was great. I hope we get a few more days like that this month.
We’re both so grateful Dad came out and helped us. Our main goal was to get the radiant heating installed and inspected so we could move forward with having our foundation poured, but we got so much more done! Woo hoo!

Maybe they were actually admiring their work this time?
Thanks for all your help, Dad, and thanks in advance for future help, and thanks in advance to other future helpers!
Previous Post: Garage Project: Ready for Radiant Heating!

This is amazing, and I am so impressed that you are rolling this project yourselves! I would not even know where to begin. (Googling “How to build a garage”?)
I hope Steven’s finger is okay; he didn’t have to get stitches, did he?
Steven watched a lot of YouTube, read a lot of forums, and read some construction books to figure this all out! I am glad he loves research – I hate it 😉
He’s fine! It’s just a bit puffy. The worst part was we had to put the sign up that says “0 days since jobsite injury” LOL.
I am beyond impressed that you guys are doing so much of this yourselves!
Aww, thank you! It’s all Steven – I’m his helper!
This is INCREDIBLE. I can’t believe all the work they are doing on their own! (And you!!) It’s so fun to see the garage come together!
Definitely winced when I read about Steven’s injury. Hope his finger is okay!
Thank you! I think it’s fun to see it come together too. I am going to do one of those photo montage things of the progress when it’s all done! Or close to done. Ha 😉
He is! It was swollen a few days but getting better! Hope that doesn’t happen again!
I am seriously SO impressed by this. I can’t even IMAGINE entertaining the thought of trying to build anything more extensive than, like, a box, never mind DIY-ing a radiant-heated garage. Amazing!
Thank you! Steven is such a great planner! They are pouring tomorrow and we are going to start putting the trusses up Saturday. They weigh 300 lbs (???) so it involves some interesting flipping process. I will report back!
It’s fascinating to see how everything is progressing, and holy cow, the amount of thought, planning, and execution for the radiant heating is nothing short of professional.
Thank you! Steven worked hard on figuring out that layout. You have to make sure the tubes are far enough away from one another. We laid them all out according to plan then I checked all the distances last night because THEY ARE POURING THE FOUNDATION RIGHT MEOW!!!!
EEEEEEEEEEEEEEEEEEK!! Holy cow, it’s gonna look so different when you get home!
It is! I can’t wait to see it! Steven has been sending me some progress pics.